Three Essential Channel Tools
Everything you need for texture channel manipulation — pack, repack, and unpack — accessible via a right-click context menu in the Content Browser.
Pack Textures
Combine up to 4 separate textures into a single RGBA texture. Map any source channel to any output channel, with fill and invert options. Includes a live preview panel.
Repack Texture
Reassign channels within a single texture or batch of textures. Save and reuse custom templates for common conversions like ORM ↔ RMA.
Unpack Texture
Split a multi-channel texture into separate grayscale textures for each channel. Customize output suffixes and invert during extraction.
User Guide
Detailed instructions for each tool with screenshots and step-by-step guides.
Pack Textures
Combine multiple textures into a single RGBA texture
Overview
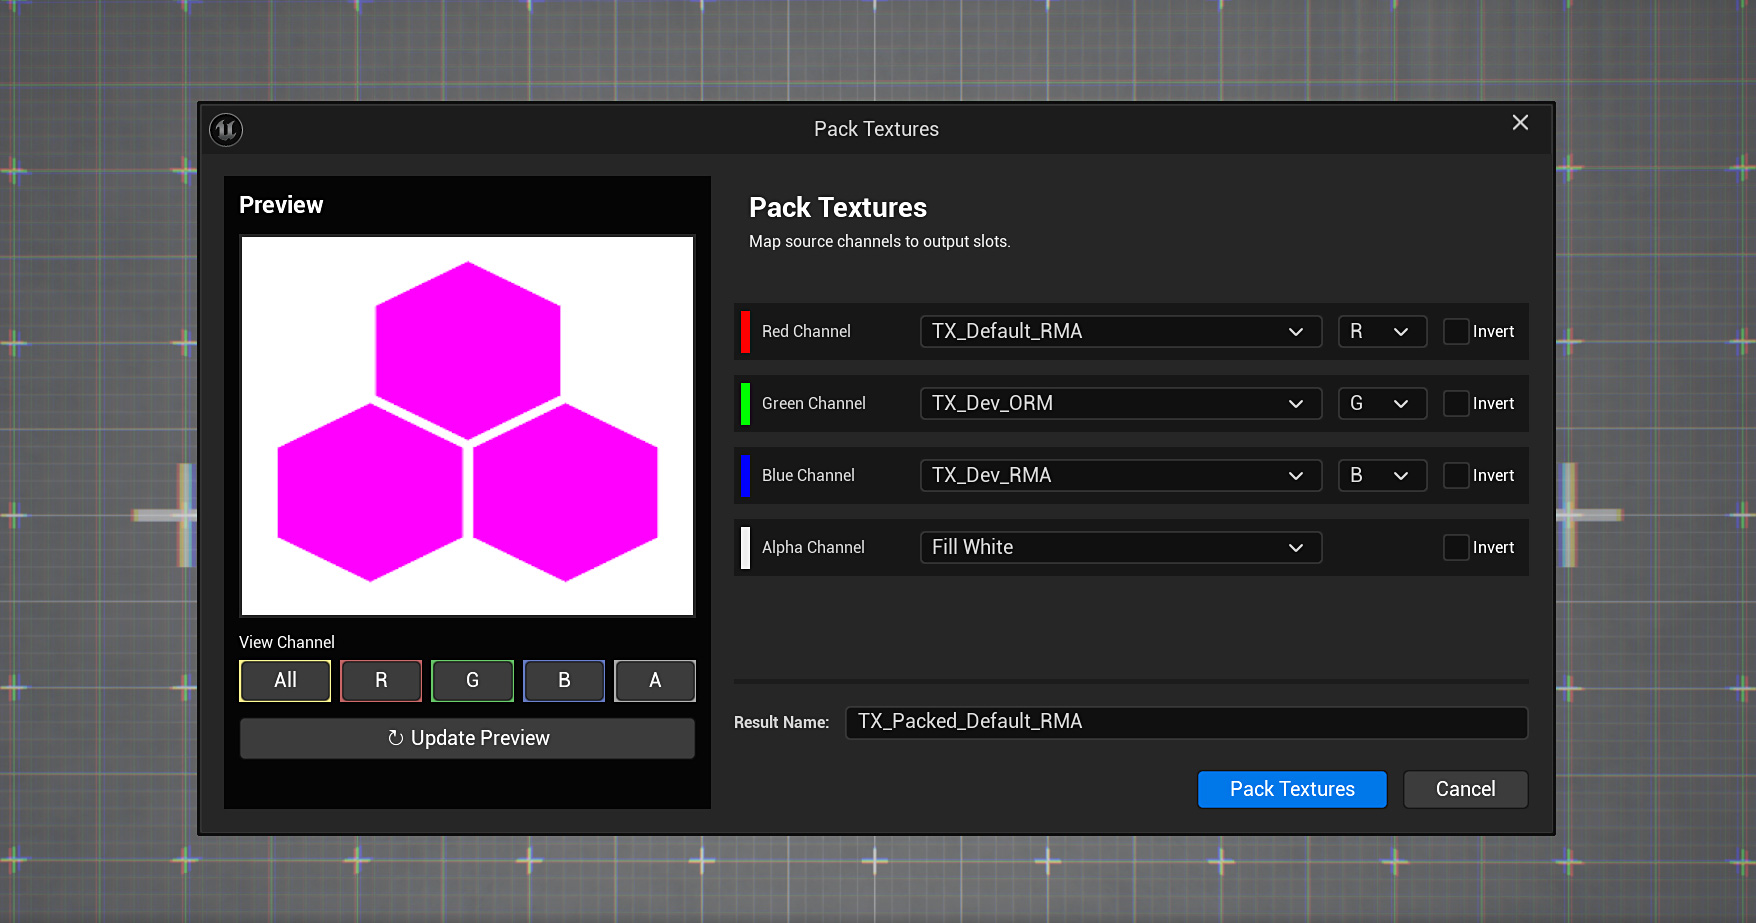
The Pack Textures tool allows you to combine multiple source textures into a single output texture. Each channel (Red, Green, Blue, Alpha) of the output can be sourced from any channel of any selected texture, or filled with a constant value (Fill Black or Fill White). All dialogs include a real-time preview with per-channel viewing.
How to Use
Select Source Textures
In the Content Browser, select all the textures you want to pack together. You can select 1–4 textures depending on your needs.
Open the Tool
Right-click on the selection and choose
Texture Channel Toolkit → Pack Textures (Channel Packing) from the
context menu.
Configure Channel Mapping
For each output channel (R, G, B, A), select the source texture and which channel to extract. You can also choose "Fill Black" or "Fill White" for constant values.
Apply Inversion (Optional)
Check the "Invert" checkbox for any channel to invert its values (0 becomes 255, 255 becomes 0).
Preview & Pack
Use the live preview panel to verify the result, toggling between All/R/G/B/A views. Enter a name for the output texture and click "Pack Textures". The new texture will be saved in the same directory as the first source texture.
Capabilities
- Choose source texture for each output channel (Red, Green, Blue, Alpha)
- Extract any channel (R / G / B / A / Gray) from source textures
- Use constant values (Fill Black or Fill White) instead of texture data
- Invert channel values with a single checkbox
- Automatic scaling when source textures have different sizes
- Real-time preview with per-channel view (All, R, G, B, A)
- Support for both 8-bit and 16-bit textures
Repack Texture
Reassign and swizzle channels within textures
Overview
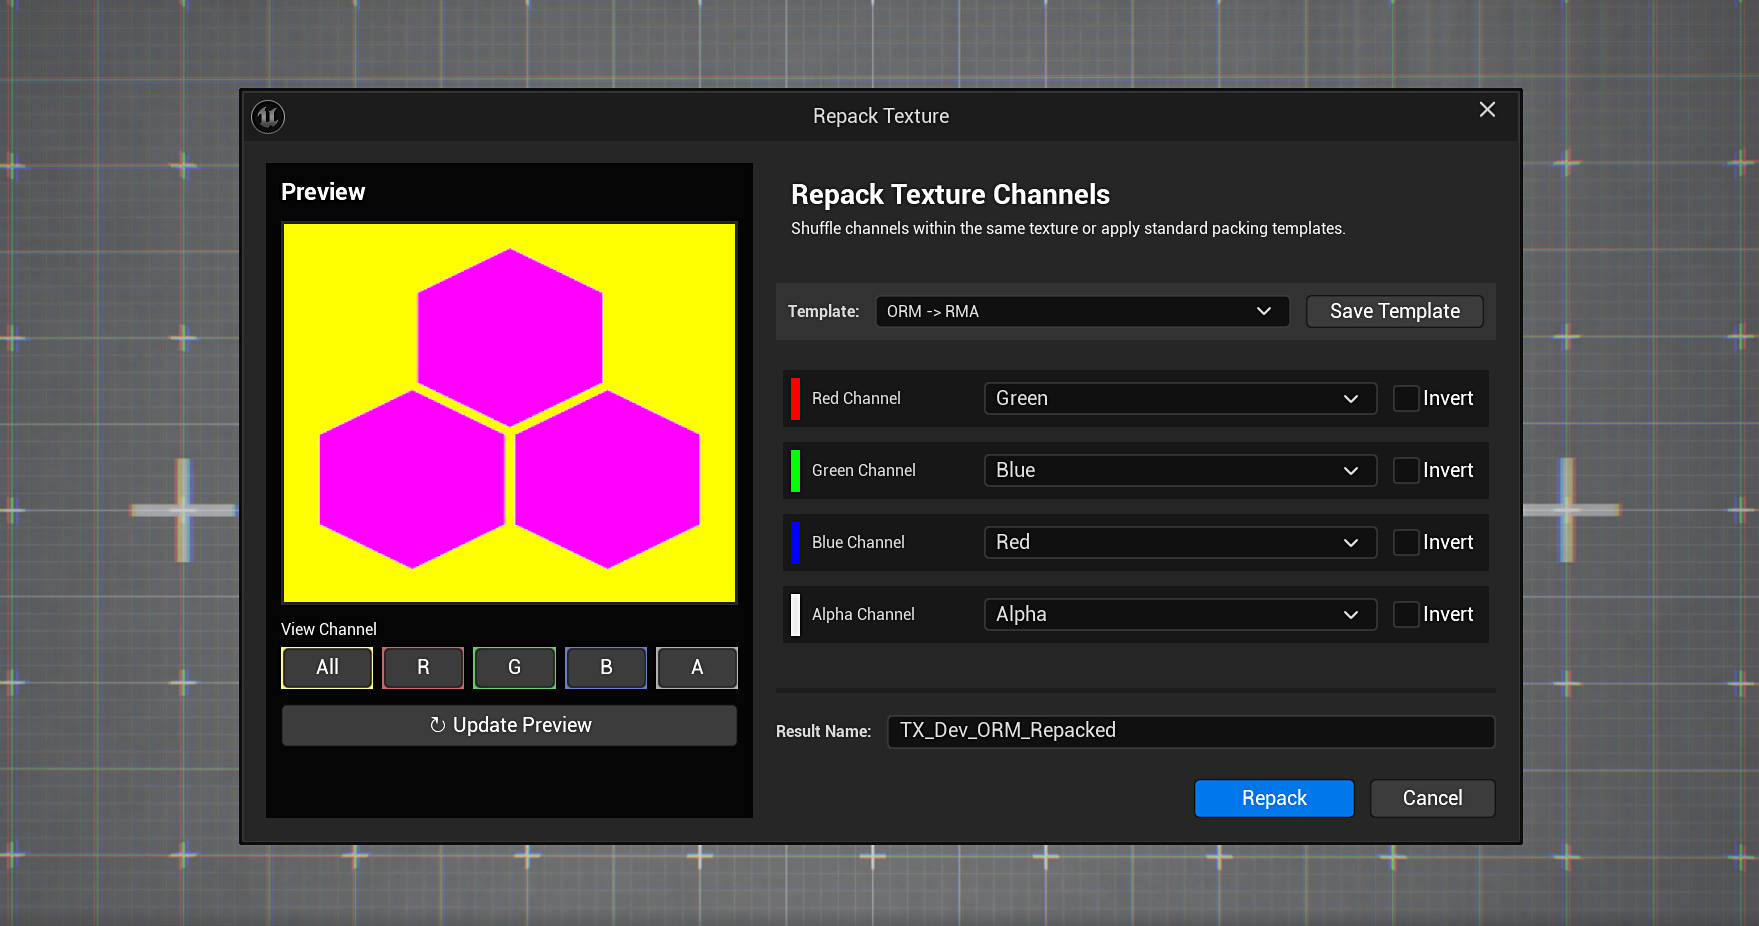
The Repack Texture tool enables you to rearrange channels within a single texture or batch of textures. This is commonly known as "channel swizzling" — for example, moving the Red channel to Green, Green to Blue, etc. You can save your configurations as reusable Data Asset templates for team-wide standardization.
How to Use
Select Textures
Select one or more textures in the Content Browser. The tool supports batch processing when multiple textures are selected.
Open the Tool
Right-click and select
Texture Channel Toolkit → Repack Texture (Shuffle Channels) from
the context menu.
Choose Template or Configure Manually
Select a preset template (like "ORM → RMA") from the dropdown, or manually configure each output channel's source. Options include Red, Green, Blue, Alpha, Constant Black, or Constant White.
Choose Save Mode
For batch processing: choose between "Create Copy" (adds a suffix) or "Overwrite" original textures. For single texture, you can specify a custom result name.
Save Template (Optional)
Click "Save Template" to save your current configuration as a reusable Data Asset for future use across your project.
Capabilities
- Channel swizzling (e.g., R→G, G→B, B→R, A→R)
- Individual channel inversion with "Invert" checkboxes
- Replace channels with constant values (Black=0 or White=255)
- Create and save custom templates as Data Assets
- Quick application of saved templates to multiple textures
- Batch processing of multiple textures simultaneously
- Overwrite mode or create copies with custom suffix
- Live preview with per-channel view
Unpack Texture
Split multi-channel textures into separate grayscale images
Overview
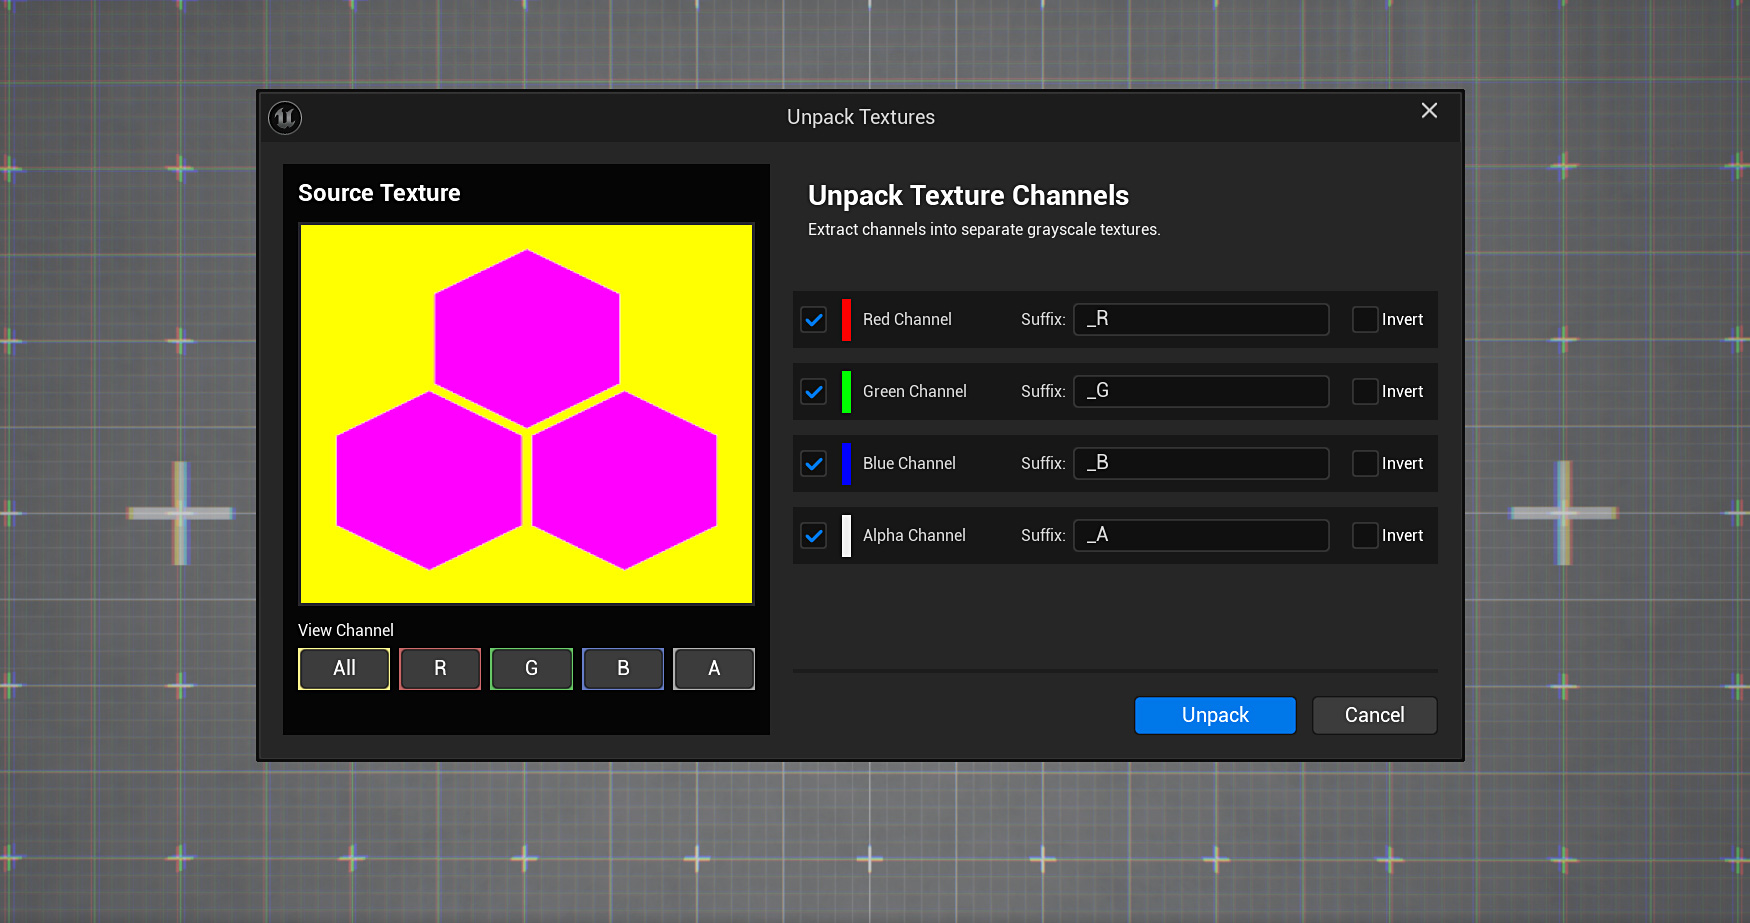
The Unpack Texture tool extracts individual channels from a multi-channel texture and saves each as a separate grayscale texture. This is useful when you need to modify individual channels or use them separately in materials.
How to Use
Select Packed Texture
Select one or more packed textures (like ORM maps) in the Content Browser.
Open the Tool
Right-click and select
Texture Channel Toolkit → Unpack Texture (Split Channels).
Select Channels to Extract
Enable/disable checkboxes for each channel (R, G, B, A) you want to extract. Disabled channels will be skipped.
Configure Suffixes
Customize the suffix for each channel's output texture (default: _R, _G, _B, _A). Output textures are named based on the source texture name plus your suffix.
Apply Inversion (Optional)
Check "Invert" for any channel to invert its values during extraction.
Capabilities
- Extract each channel to a separate grayscale texture
- Selective unpacking — enable/disable each channel individually
- Customizable suffixes for each channel output
- Invert channels during extraction
- Live source preview with per-channel view
- Output textures saved in the same directory as the source
- Batch unpacking of multiple textures at once
Supported Formats
Texture Channel Toolkit works with all common Unreal Engine texture source formats.
Built for Texture Workflows
Texture Channel Toolkit is designed for anyone working with texture channels in Unreal Engine.
Technical Artists
Get full control over texture channels and create standard packing templates for your team.
Environment Artists
Pack ORM/RMA masks from individual texture maps without leaving Unreal Engine.
Game Developers
Quickly convert between different texture packing conventions (ORM ↔ RMA, etc.).
Studios & Teams
Standardize texture channel packing across your team with reusable Data Asset templates.