Powerful Texture Tools
Six specialized tools to handle every aspect of texture management in your Unreal Engine projects.
Pack Textures
Combine multiple textures into a single texture by distributing them across RGBA channels. Perfect for creating material masks.
Repack Texture
Reassign channels within a texture or create new channel combinations. Save and apply custom templates for batch processing.
Unpack Texture
Split a multi-channel texture into separate grayscale textures for each channel (R, G, B, A).
Resize Textures
Batch resize textures with advanced quality and optimization settings. Filter by size and preview estimated savings.
Cleanup Unused
Find all textures in your project that aren't used in any materials or levels. Deep dependency chain analysis.
Optimized Normal Map
Create optimized normal maps with additional data in the Blue channel. Save up to 33% GPU memory.
User Guide
Detailed instructions for each tool with screenshots and step-by-step guides.
Pack Textures
Combine multiple textures into a single RGBA texture
Overview
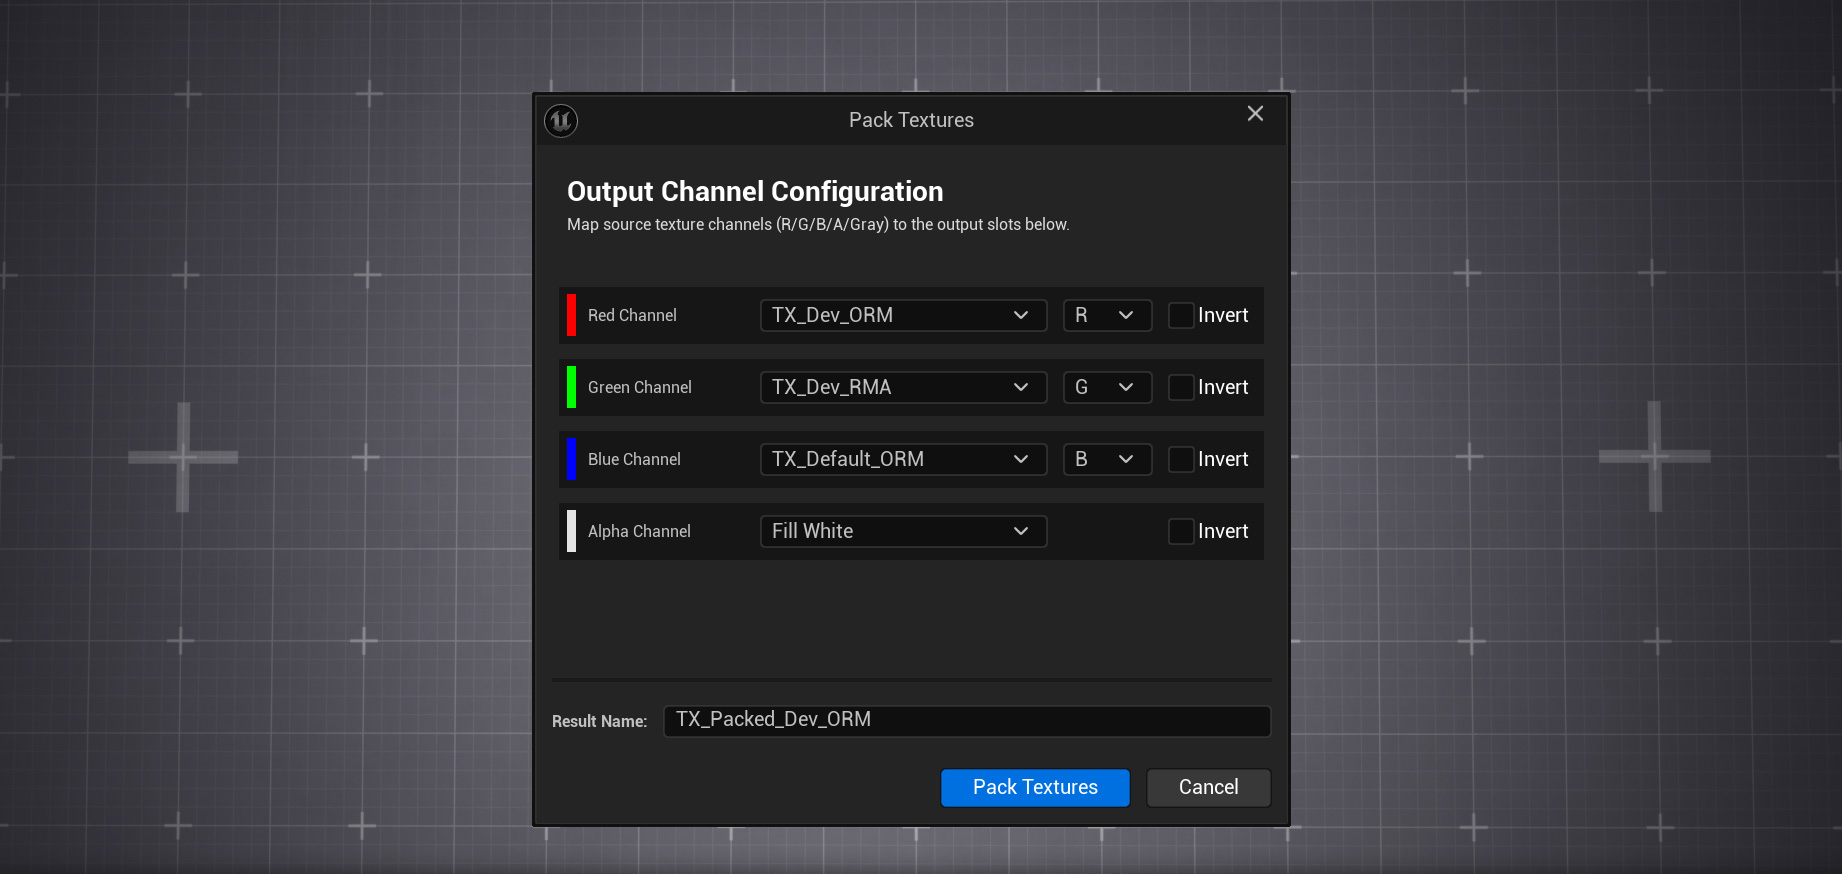
The Pack Textures tool allows you to combine multiple source textures into a single output texture. Each channel (Red, Green, Blue, Alpha) of the output can be sourced from any channel of any selected texture, or filled with a constant value (black or white).
How to Use
Select Source Textures
In the Content Browser, select all the textures you want to pack together. You can select 1-4 textures depending on your needs.
Open the Tool
Right-click on the selection and choose
ProTextureTools → Pack Textures from the context menu.
Configure Channel Mapping
For each output channel (R, G, B, A), select the source texture and which channel to extract. You can also choose "Fill Black" or "Fill White" for constant values.
Apply Inversion (Optional)
Check the "Invert" checkbox for any channel to invert its values (0 becomes 255, 255 becomes 0).
Set Result Name and Pack
Enter the name for the output texture and click "Pack Textures". The new texture will be created in the same directory as the first source texture.
Capabilities
- Choose source texture for each output channel (Red, Green, Blue, Alpha)
- Extract any channel (R/G/B/A/Gray) from source textures
- Use constant values (Fill Black or Fill White) instead of texture data
- Invert channel values with a single checkbox
- Automatic scaling when source textures have different sizes
- Support for both 8-bit and 16-bit textures
Repack Texture
Reassign and swizzle channels within textures
Overview
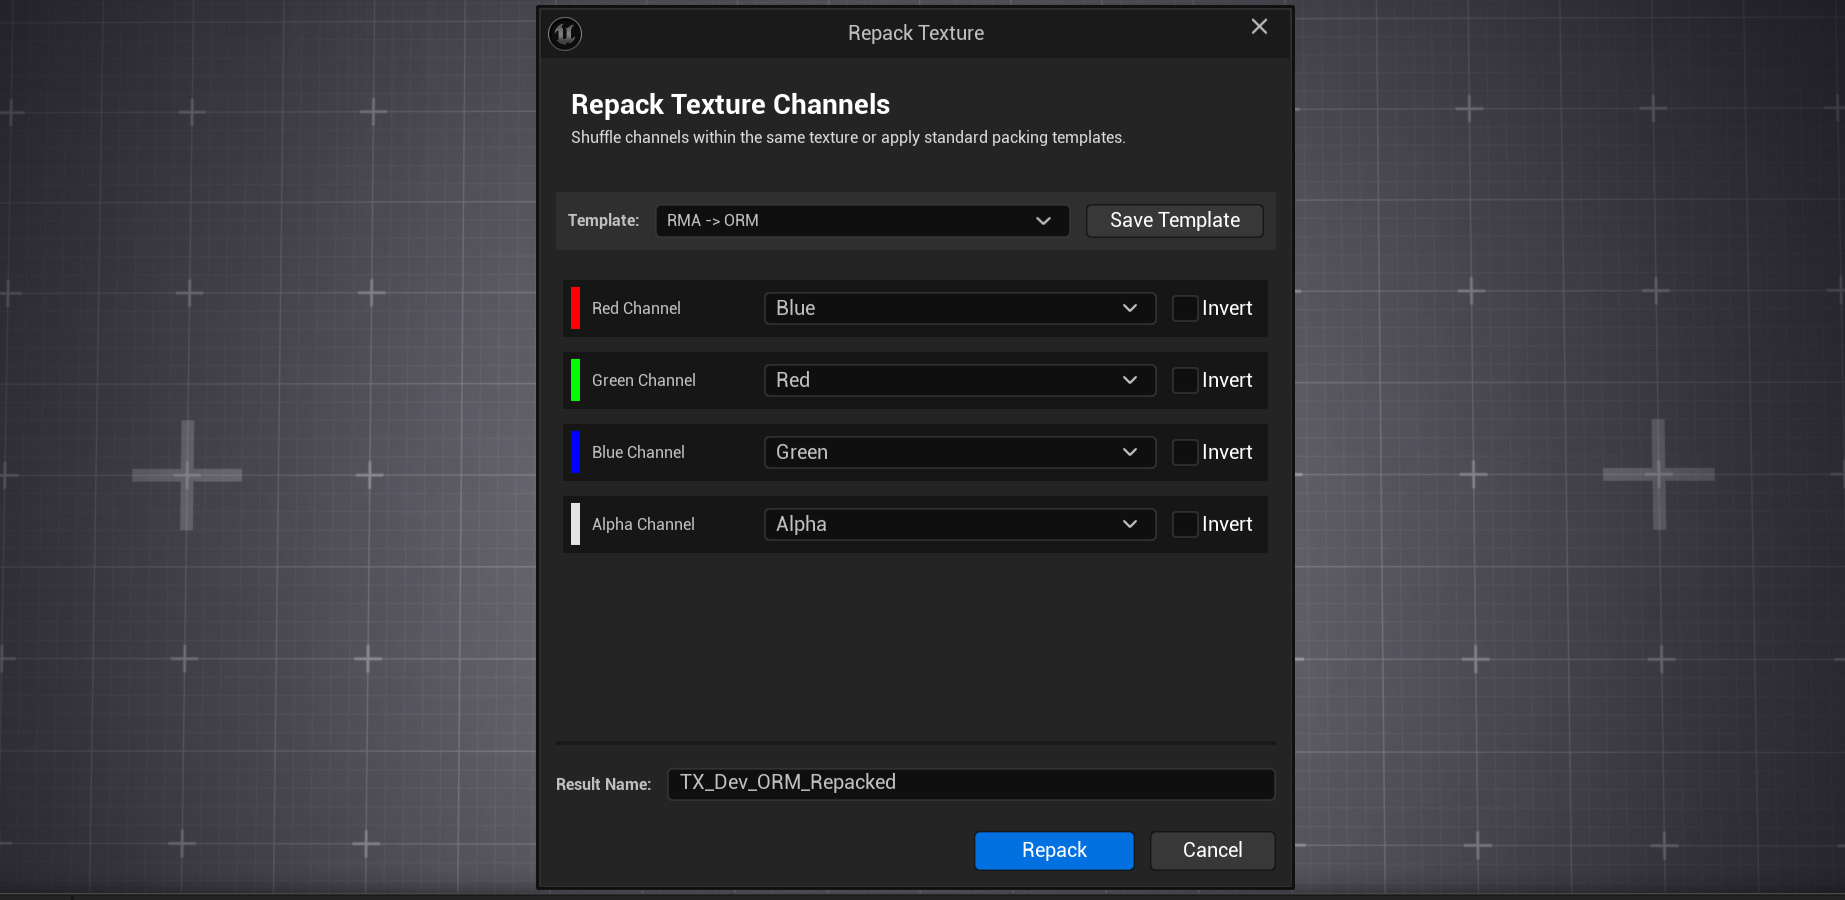
The Repack Texture tool enables you to rearrange channels within a single texture or batch of textures. This is commonly known as "channel swizzling" - for example, moving the Red channel to Green, Green to Blue, etc. You can also save your configurations as reusable templates.
How to Use
Select Textures
Select one or more textures in the Content Browser. The tool supports batch processing when multiple textures are selected.
Open the Tool
Right-click and select ProTextureTools → Repack Texture from the
context menu.
Choose Template or Configure Manually
Select a preset template (like "RMA → ORM") from the dropdown, or manually configure each output channel's source. Options include Red, Green, Blue, Alpha, Constant Black, or Constant White.
Choose Save Mode
For batch processing: choose between "Create Copy" (adds a suffix) or "Overwrite" original textures.
Save Template (Optional)
Click "Save Template" to save your current configuration as a reusable Data Asset for future use across your project.
Capabilities
- Channel swizzling (e.g., R→G, G→B, B→R, A→R)
- Individual channel inversion with "Invert" checkboxes
- Replace channels with constant values (Black=0 or White=255)
- Create and save custom templates as Data Assets
- Quick application of saved templates to multiple textures
- Batch processing of multiple textures simultaneously
- Overwrite mode or create copies with custom suffix
Unpack Texture
Split multi-channel textures into separate grayscale images
Overview
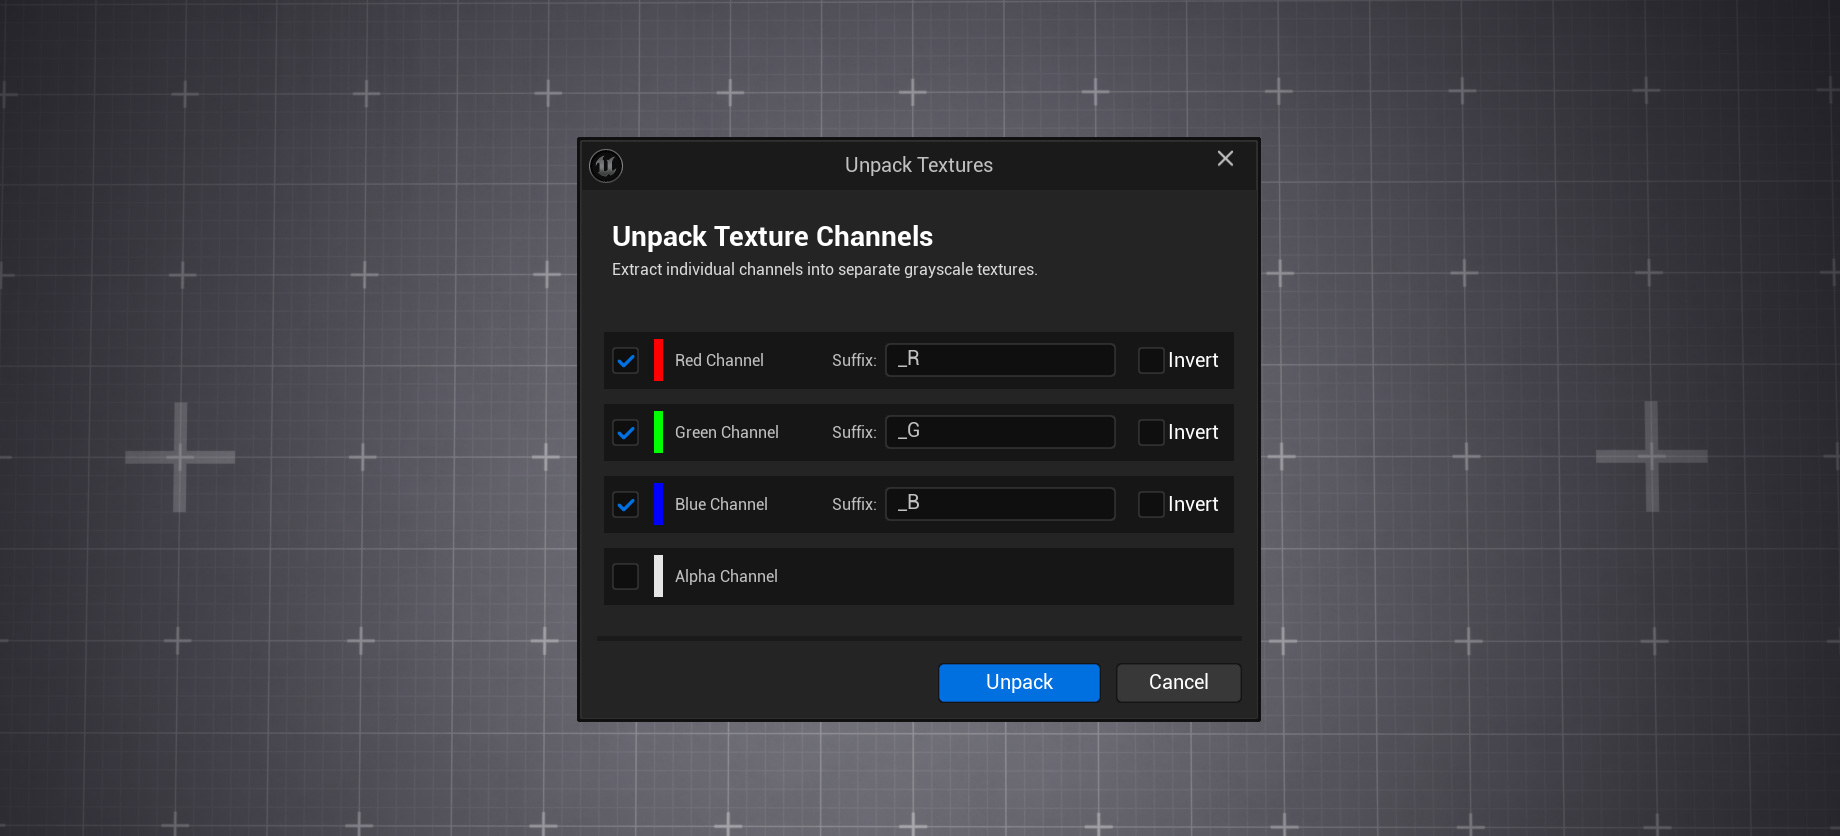
The Unpack Texture tool extracts individual channels from a multi-channel texture and saves each as a separate grayscale texture. This is useful when you need to modify individual channels or use them separately in materials.
How to Use
Select Packed Texture
Select one or more packed textures (like ORM maps) in the Content Browser.
Open the Tool
Right-click and select ProTextureTools → Unpack Texture.
Select Channels to Extract
Enable/disable checkboxes for each channel (R, G, B, A) you want to extract. Disabled channels will be skipped.
Configure Suffixes
Customize the suffix for each channel's output texture (default: _R, _G, _B, _A). Output textures are automatically prefixed with "TX_".
Apply Inversion (Optional)
Check "Invert" for any channel to invert its values during extraction.
Capabilities
- Extract each channel to a separate grayscale texture
- Selective unpacking - enable/disable each channel individually
- Customizable suffixes for each channel output
- Invert channels before extraction
- Automatic naming with TX_ prefix for consistency
- Textures saved in the same directory as source
Resize Textures
Batch resize with advanced quality settings
Overview
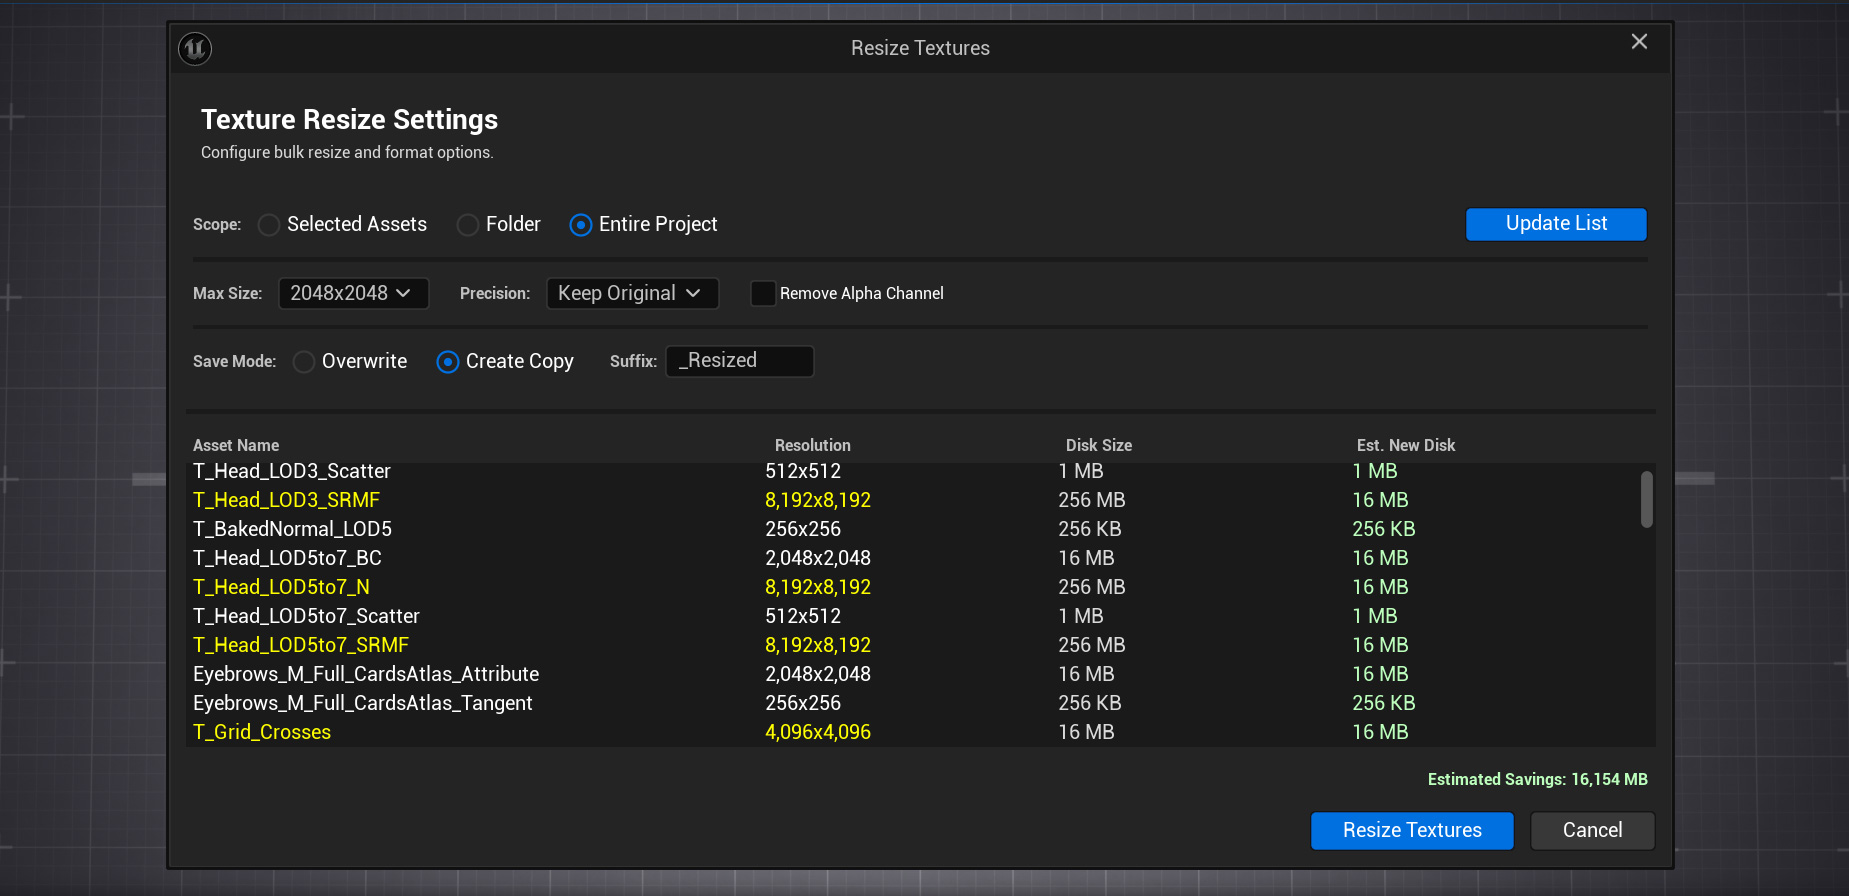
The Resize Textures tool provides batch resizing capabilities with advanced options for quality control and optimization. Preview estimated disk savings before processing and filter textures by current size.
How to Use
Select Textures or Scope
Select textures in Content Browser, or use the dialog to scan Selected Assets, a specific Folder, or the Entire Project.
Open the Tool
Right-click and select ProTextureTools → Resize Textures.
Configure Settings
Set the maximum texture size (e.g., 2048x2048). Choose precision (8-bit or 16-bit) and whether to remove alpha channels.
Review Texture List
The dialog shows all textures that exceed your maximum size, with current resolution, disk size, and estimated new size. Yellow/red highlighting indicates oversized textures.
Choose Save Mode
Select "Overwrite" to replace originals, or "Create Copy" with a custom suffix.
Capabilities
- Batch resize selected textures or scan entire project
- Set maximum size (maintains aspect ratio)
- Remove alpha channel option for RGB-only output
- Choose precision: 8-bit or 16-bit output
- Filter and preview textures by size before processing
- View estimated disk savings in real-time
- Create copies with suffix or overwrite originals
Cleanup Unused Textures
Find and remove textures not used in your project
Overview
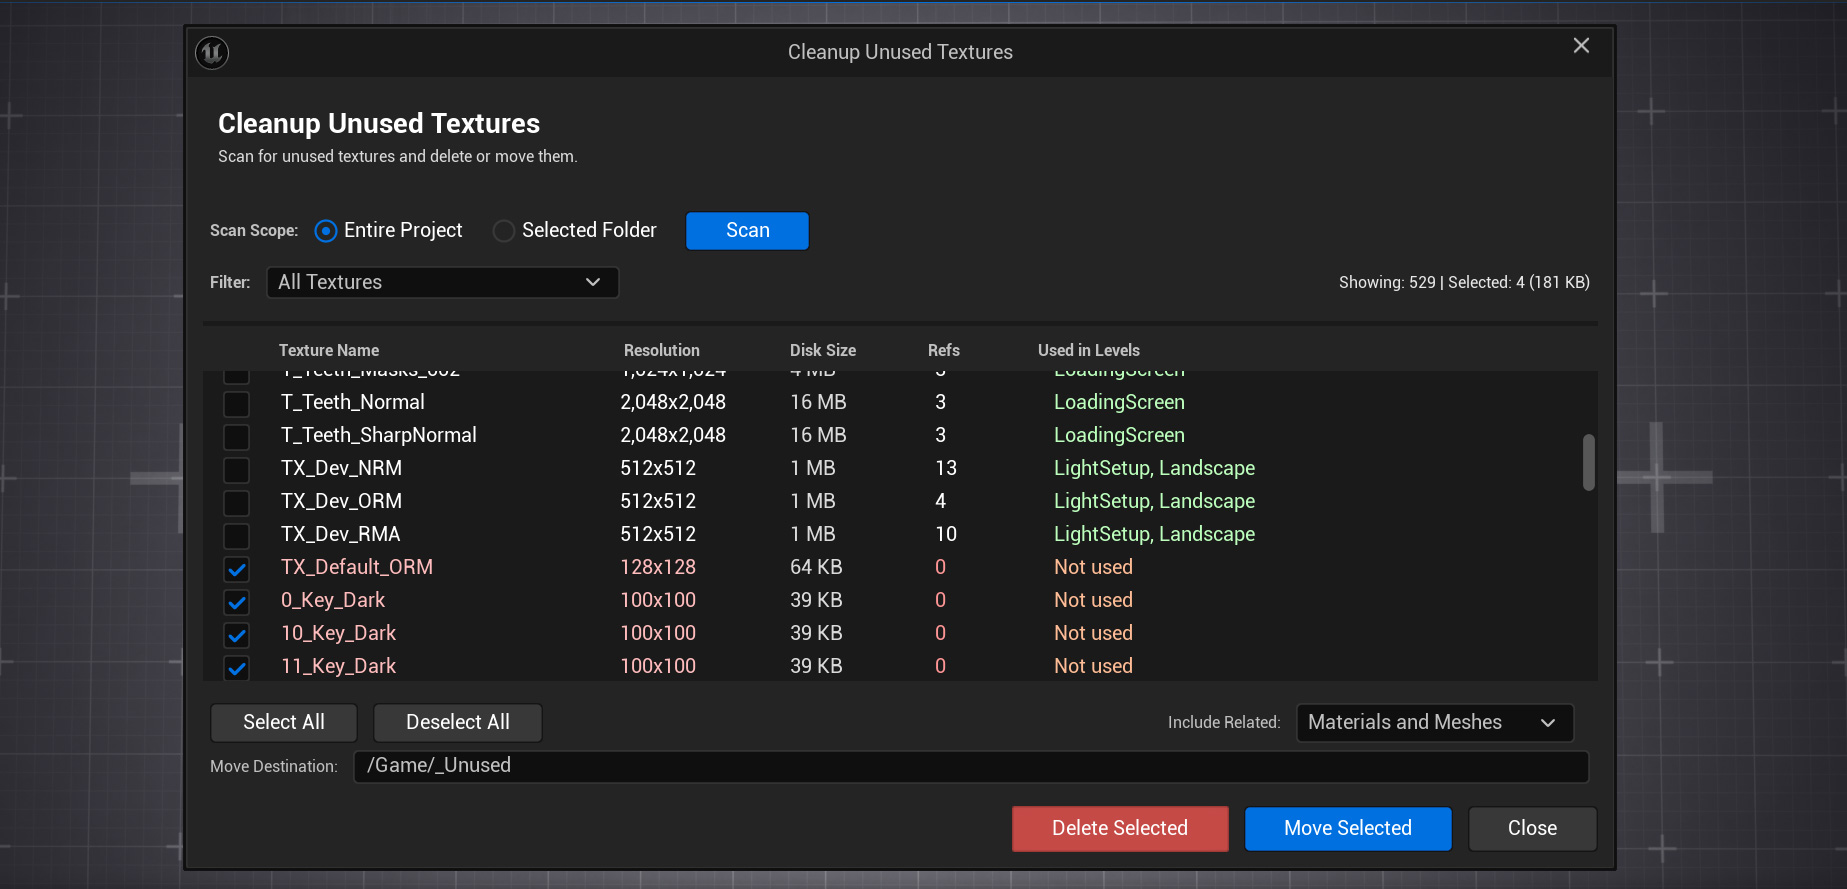
The Cleanup Unused Textures tool performs deep dependency analysis to identify textures that are not actually used in your project. Unlike simple reference checking, this tool analyzes full dependency chains and level usage to find truly orphaned assets.
How to Use
Open the Tool
Right-click on any texture or folder and select
ProTextureTools → Cleanup Unused Textures,
or access it from the main menu.
Choose Scan Scope
Select "Entire Project" to scan all textures, or "Selected Folder" to limit the scan to a specific directory.
Click Scan
The tool will analyze all textures, checking references in materials, blueprints, and level assets. This may take a moment for large projects.
Review Results
The list shows all unused textures with their resolution, disk size, reference count, and which levels use them. Zero refs and "Not used" indicate orphaned textures.
Delete or Move
Select textures using checkboxes, then choose "Delete Selected" to permanently remove them, or "Move Selected" to relocate them to a specified folder for later review.
Capabilities
- Deep dependency chain analysis - not just reference checking
- Detect texture usage across all project levels
- Identify textures with references but not actually used
- Scan entire project or specific folders
- Display texture list with size information and ref counts
- Filter by directory or texture type
- Option to delete or move to a specific folder
- Include related materials and meshes option
Create Optimized Normal Map
Pack normal data with additional channel for memory savings
Overview
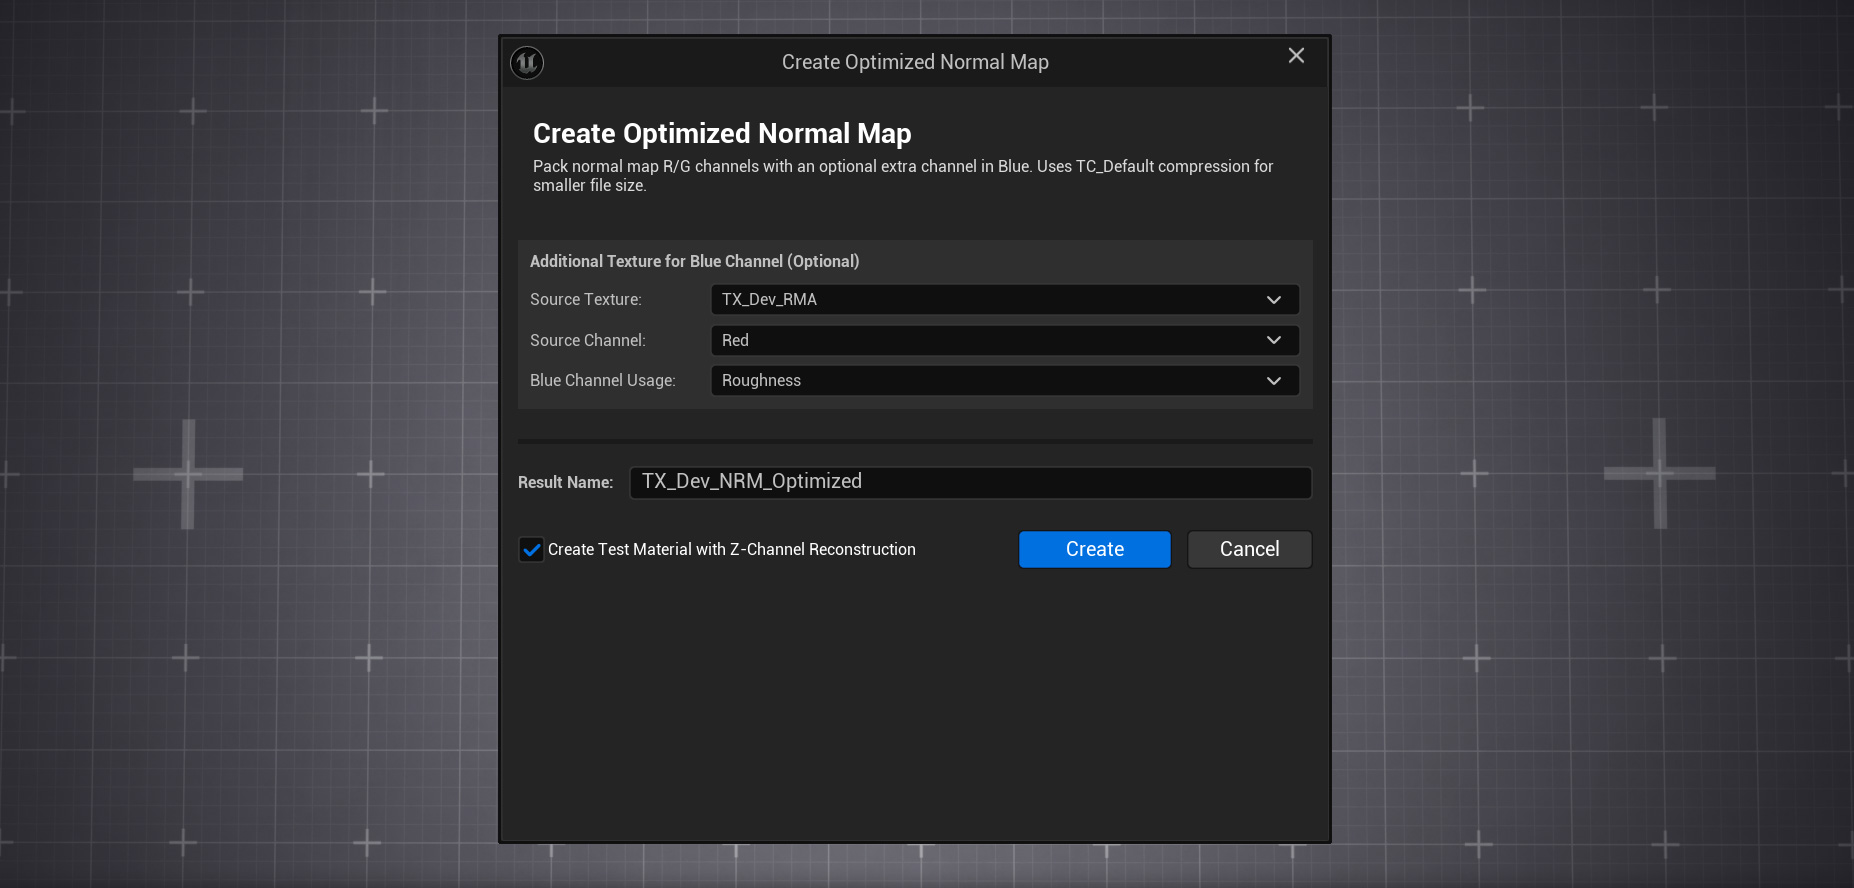
This advanced tool creates optimized normal maps that store only the X and Y components of the normal vector (in R and G channels), while the Z component is reconstructed in the shader. The freed Blue channel can store additional data like Roughness, Metallic, or AO - potentially saving up to 33% GPU memory.
How to Use
Select Normal Map(s)
Select one or more textures with TC_Normalmap compression setting.
Optionally, also select an additional texture (non-normal) for the Blue channel
data.
Open the Tool
Right-click and select
ProTextureTools → Create Optimized Normal Map.
Configure Blue Channel Source
If you selected an additional texture, choose which of its channels (R/G/B/A) should be packed into the output's Blue channel.
Set Blue Channel Usage
Specify what the Blue channel will represent in your material: Roughness, Metallic, or Ambient Occlusion.
Create Test Material (Optional)
Enable "Create Test Material with Z-Channel Reconstruction" to automatically generate a material that demonstrates proper normal reconstruction.
Shader Z-Reconstruction
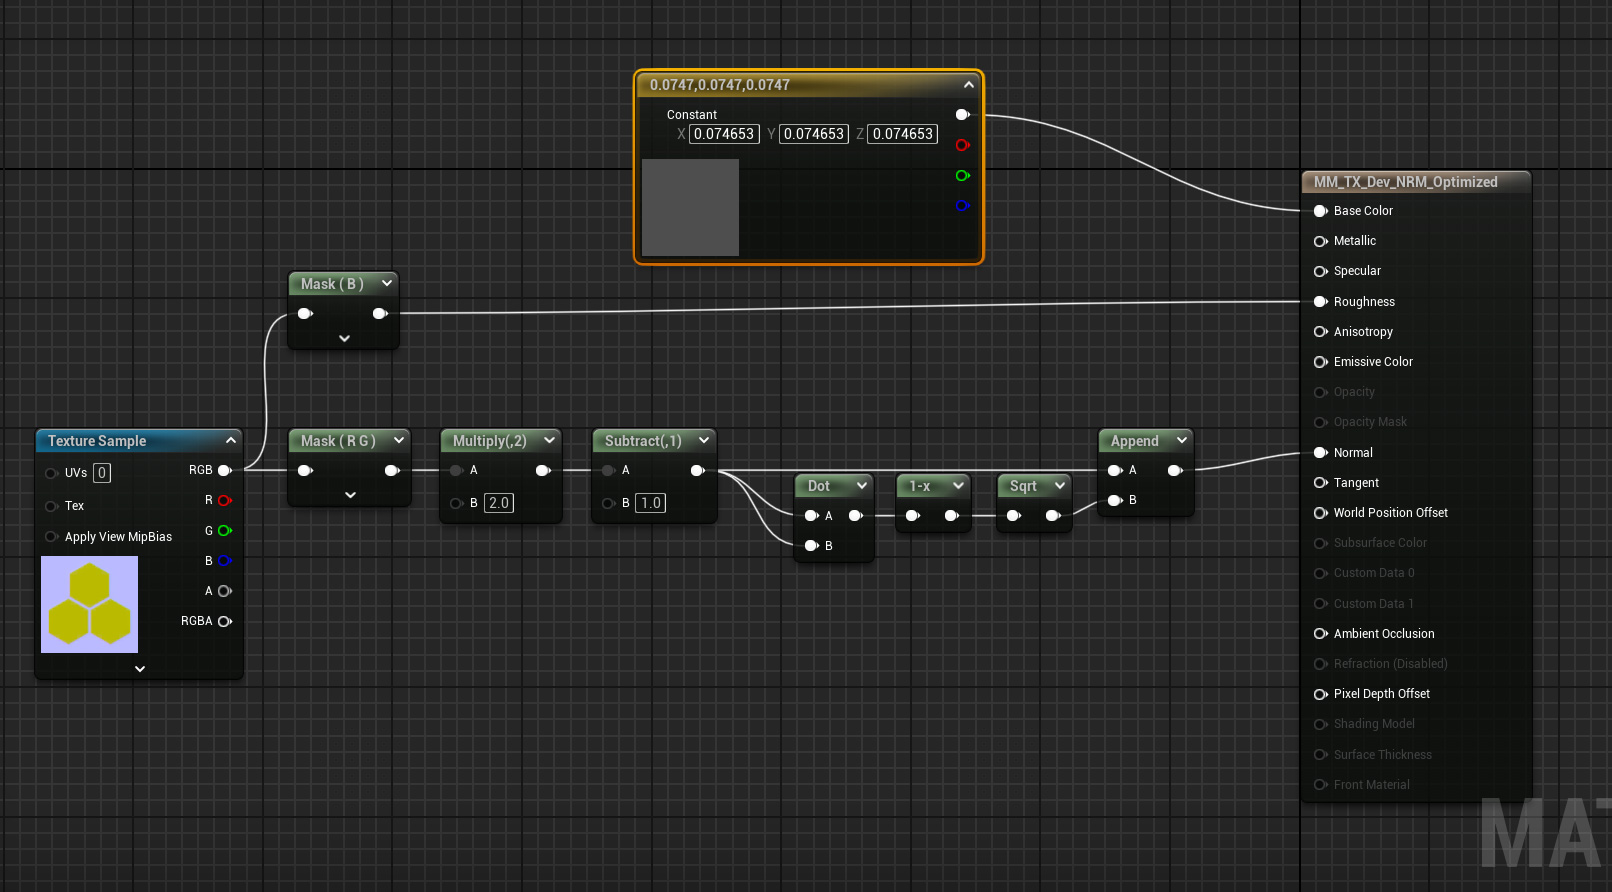
The auto-generated test material includes the mathematical nodes for reconstructing the Z component:
Reconstruction Formula
Math: Z = sqrt(1 - dot(XY, XY)) where XY is the normalized
normal XY in [-1, 1] range.
Capabilities
- Store only R and G channels of normal (Z reconstructed in shader)
- Pack additional data (Roughness/Metallic/AO) in Blue channel
- Choose source channel from additional texture
- Automatic test material creation with Z reconstruction math
- Preserve Flip Green Channel setting from original normal map
- Uses TC_Default compression (not TC_Normalmap) for better Blue channel quality
- Save up to 33% GPU memory per normal map
Supported Formats
ProTextureTools works with all common Unreal Engine texture formats.
Built for Professionals
ProTextureTools is designed for anyone working with textures in Unreal Engine.
Game Designers
Accelerate texture preparation for materials without needing external tools.
3D Artists
Automate routine texture operations and focus on creating art.
Technical Artists
Get full control over texture channels and create optimized pipelines.
Development Studios
Standardize texture workflow across your team with templates.
Mobile Developers
Optimize textures for memory savings critical on mobile platforms.